My favorite shortcut for scheduling Zoom meetings
There are a few different ways to go about setting up a Zoom meeting—I think I’ve tried them all and I have come up with my own system that I think is the fastest. I thought this tip might be useful for other people as we increasingly rely on Zoom to communicate with our colleagues and study participants. My method uses the Zoom Personal Room feature combined with Outlook’s “Quick Parts” feature. (Note: these instructions for Quick Parts are specific to Outlook for Windows desktop version. If you are using webmail or a different operating system, try googling for instructions on how to set up Quick Parts for those systems.)
Here's how it works:
Step one: Set up a Zoom Personal Meeting Room with the "Waiting Room" feature turned on. This will create a permanent link that you can use for all of your meetings without having to log into Zoom. The Waiting Room feature helps ensure security for your meeting--read more at UCSF IT's page on Recommended Security Settings for Zoom.
- Login to your UCSF Zoom account.
- In the left-hand menu, select “meetings”.
- In the horizontal menu at the top of the page, select “Personal Meeting Room”.
- Follow the prompts on this page to set up a meeting invitation that you can use anytime. Be sure to enable the "Waiting Room" feature to ensure privacy on your calls. You can customize your “Meeting ID” if you like—many people like to use their office phone number so it is easy to remember.
- Save your changes and use the “Copy the invitation” link to view and copy the meeting details. Keep this information handy while you move on to the second part.
Step two: save your Zoom Personal Meeting Room information in Outlook as a “Quick Part”.
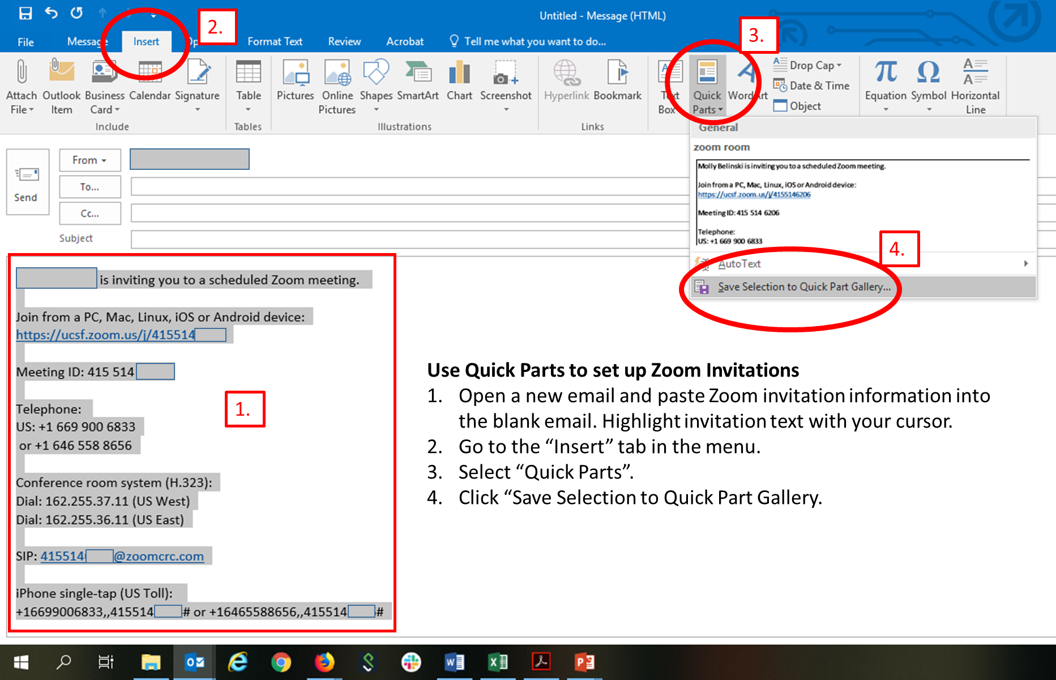
- Open a new email and paste Zoom invitation information into the blank email. Highlight the invitation text with your cursor.
- Go to the “Insert” menu ribbon
- Select “Quick Parts”
- Click “Save Selection to Quick Part Gallery. (See image below for steps 1-4.)
- A “Create New Building Block” box will pop up. In the “Name” field, give your saved text a name (I save mine as “Zoom Room”.) Click “Save”.
Putting it all together…
To use your new Zoom Room Quick Part, simply open a new email or calendar invitation and start to type your Quick Part name (eg, “Zoom Room”). Once you type a few letters of your Quick Part name, you will see a small box appear with a preview of your saved Zoom invitation. Just hit “enter” and your saved Zoom Invitation text will be inserted into your email or calendar invitation.
That’s it! It takes about 5 minutes to set up, but once you do, it will take seconds to send out a Zoom meeting invitation.